
It all started the day Lindsay and Mike went to a bike recycling place. Well, they found an old yellow steel road frame that they knew would be perfect for some bigger guy who'd recently mentioned wanting to build a fixie (OK, me). Well, that cold winter's night at the track, I got an early Christmas present.
I thought I'd keep a log of how the build is going. This is it - it begins here. I'll try and include plenty of pics, witty anecdotes, and different details that I think might be interesting or relevant for building a fixie generally. Of course, the grand vision is that everyone in the club, and then the world, will have a fixie and forget how they ever spent thousands of dollars on carbon fibre, narrow chains and rear cassettes with more layers than a slice of baclava.
Or not. Whatever. Enjoy!
Buildin' a fixie!

I figured that I can have an instant fixie if I just stop changing gears.
Enjoy the build!
Enjoy the build!
1. Sunday, 29th July
Cost = $0
With my girlfriend away, I finally got the chance to spend some quality time with the attractive piece of steel that Lindsay and Mike found for me on Monday this week.


Fulcheni. Ha! Who ever heard of that?!

Nice lugs at the headtube - embedded geometric designs painted black

Seat clamp. Nice scalloped finish on the seatstays

Parallel dropouts - just what you need for a fixie. These are stamped GIPEMME
There was only one thing on the frame when I got it - a mangy bottom bracket. When I finally got the axle to turn, there was a grinding, crunchy feeling. It had to come out.
I was pleasantly surprised that with careful nudgings from a lockring tool, the non-drive side unscrewed nicely.

Bottom bracket - non-drive side and axle removed

Unscrewing the drive-side with multi-grips

Sheesh! No wonder it wouldn't turn. That's a mixture of rust, water, old grease and . . . I think bunyip snot?

Components of the bottom bracket. Stamped MTBS512 on one side of the axle, and Bo 3S on the other.

Bottom bracket cleaned and reassembled. Would it sell on eBay?

Inside the bottom bracket in the frame. Not much rust. Interesting view of the location of the different frame tubes. Note also the cable guides on the top (underside) of the bottom bracket - the previous owner had run the cables bare through here and they'd scored the paint from the frame. Surely there was a better way to do it?

Underside of a headtube lug. I think it's stamped WOS or SCM.
Well, that's as far as I got. I spent some time muckin' around with a rag rubbing at spots trying to tell what were bits of rust, and what were bits of grime. They were mostly little rust spots, but the frame seems like it's in pretty good nick.
Cost = $0
With my girlfriend away, I finally got the chance to spend some quality time with the attractive piece of steel that Lindsay and Mike found for me on Monday this week.
Fulcheni. Ha! Who ever heard of that?!
Nice lugs at the headtube - embedded geometric designs painted black
Seat clamp. Nice scalloped finish on the seatstays
Parallel dropouts - just what you need for a fixie. These are stamped GIPEMME
There was only one thing on the frame when I got it - a mangy bottom bracket. When I finally got the axle to turn, there was a grinding, crunchy feeling. It had to come out.
I was pleasantly surprised that with careful nudgings from a lockring tool, the non-drive side unscrewed nicely.
Bottom bracket - non-drive side and axle removed
Unscrewing the drive-side with multi-grips
Sheesh! No wonder it wouldn't turn. That's a mixture of rust, water, old grease and . . . I think bunyip snot?
Components of the bottom bracket. Stamped MTBS512 on one side of the axle, and Bo 3S on the other.
Bottom bracket cleaned and reassembled. Would it sell on eBay?
Inside the bottom bracket in the frame. Not much rust. Interesting view of the location of the different frame tubes. Note also the cable guides on the top (underside) of the bottom bracket - the previous owner had run the cables bare through here and they'd scored the paint from the frame. Surely there was a better way to do it?
Underside of a headtube lug. I think it's stamped WOS or SCM.
Well, that's as far as I got. I spent some time muckin' around with a rag rubbing at spots trying to tell what were bits of rust, and what were bits of grime. They were mostly little rust spots, but the frame seems like it's in pretty good nick.
-
Simon Llewellyn

- Posts: 1532
- Joined: 13 Nov 2006, 22:31
- Location: Tempe Velodrome
Alright you've got a spot on the webpage, so your effort will for ever be remembered. Now just keep posting with lots of photos....
http://dhbc.org.au/index.php?pr=track19
Plus i think we need a better photo of you winking or something... But there will be no pink text for this page...
http://dhbc.org.au/index.php?pr=track19
Plus i think we need a better photo of you winking or something... But there will be no pink text for this page...
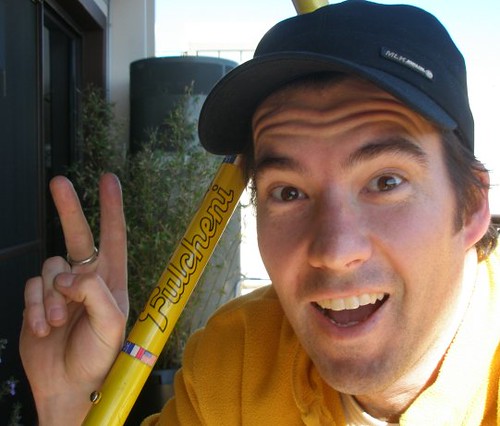
I know this is gonna haunt me forever, but how about this photo?
-
Simon Llewellyn
- Posts: 1532
- Joined: 13 Nov 2006, 22:31
- Location: Tempe Velodrome
That photo is an instant classic! It's going straight on the website!
-
mikesbytes

- Posts: 6991
- Joined: 13 Nov 2006, 13:48
- Location: Tempe
- Contact:
Matching frame and jacket.....
Clearly that's a yellow jersey!Matching frame and jacket.....
-
mikesbytes
- Posts: 6991
- Joined: 13 Nov 2006, 13:48
- Location: Tempe
- Contact:
Well spotted. Now Huw's going to have to defend it.Clearly that's a yellow jersey!
Great stuff Huw, and how lucky are you to get such an early christmas pressie.
You might find this flick interesting
http://www.youtube.com/watch?v=01TPK7ChLmA
and these guys may be able to help you own with some new wheels.
http://www.chainringtransitauthority.com/
good luck
You might find this flick interesting
http://www.youtube.com/watch?v=01TPK7ChLmA
and these guys may be able to help you own with some new wheels.
http://www.chainringtransitauthority.com/
good luck
-
mikesbytes
- Posts: 6991
- Joined: 13 Nov 2006, 13:48
- Location: Tempe
- Contact:
Huw, are you going to use the BB that came with the frame?
Sorry everyone for that photo. Particularly for how crazy that guy looks.
Mike, I'm not sure about using that bottom bracket, though I guess it is a possibility. It actually cleaned up a bit better than I thought it would, though I'd definitely get some new bearings - the ones in there have lots of crazing on the surface. Simon particularly has been describing the importance of getting a good quality BB. Depending on the crankset I end up with, I'm happy to sink some real money into a new BB.
Adrian, they were some great links! I also like Bob's Garage on the Fixed Gear Gallery website:
http://www.fixedgeargallery.com/columns ... indexb.htm
I'll start collecting these - eventually perhaps we could include the best ones on the webpage?
Lindsay, I loved your pasta gag. Any suggestions for how I could play up the pasta theme (Add a ham-coloured saddle? Tomato-flavoured bar tape?) are most welcome.
-
mikesbytes
- Posts: 6991
- Joined: 13 Nov 2006, 13:48
- Location: Tempe
- Contact:
A new bottom bracket won't break the bank

I'm eyeing these off as an upgrade for my fixie..... http://cgi.ebay.com.au/ws/eBayISAPI.dll ... :IT&ih=008
Depends on the final price of course.
Depends on the final price of course.
-
mikesbytes
- Posts: 6991
- Joined: 13 Nov 2006, 13:48
- Location: Tempe
- Contact:
Did the forks fit?
No, unfortunately.
-
mikesbytes
- Posts: 6991
- Joined: 13 Nov 2006, 13:48
- Location: Tempe
- Contact:
Bugger
-
mikesbytes
- Posts: 6991
- Joined: 13 Nov 2006, 13:48
- Location: Tempe
- Contact:
Dropped by at the Nunnary today, there are more bits inside the shed. Spotted some alloy shimano break leavers that would do good service on someones fixie. Its a matter looking thru all the stuff to find the right bit.
My fixie project is goin' real slow. There have been a number of compatibility issues with the frame that have been slowing me down. That, along with spending pretty much all my spare time in the last several weeks on my bike.
The latest, final, but most difficult issue (as I've told anyone who'll listen), is that I'm unable to find a fork that'll fit the super-tall headtube on this old frame. The headtube is 200 mm, and threaded steerer headsets usually require around 35-36 mm extra length, so I need a fork that has at least 236 mm steerer length that is 1" diameter for 700C wheels. I'd really prefer a road-type fork (i.e. without cantilever mounts).
Does anyone have a suitable old fork lying around? Or else, does anyone know of a large (60 cm), 700C road frame/fork combo (or old steel roadbike) that I could have/purchase?

Huw,
I have an old centurion steel frame and fork at home which might be the right size (seat tube is 60cm and top tube 58ish from memory) but its pretty heavy. Alternatively the forks might be just long enough for your fettuccinni frame, I'm not using either so youre welcome to them. Private message me if you want to have a look. I live near Bobos.
Matt
I thought it was only open on Mondays and, like, every seventh Groundhog day but only during a neap tide and not if your breakfast cereal contained folate. I'm just not able to make it there during the day on Monday, if that's when it's open.Have you tried the Nunnery in Newtown?
Oh wait, I checked their website: 4 (or 5) pm till 9:30 pm Mondays. Perhaps I'll swing by and have a look.
-
mikesbytes
- Posts: 6991
- Joined: 13 Nov 2006, 13:48
- Location: Tempe
- Contact:
I didn't notice anything of interest in the way of forks for you at the Nunnery when I dropped by about a month ago, but stuff comes and goes and also there is boxes of stuff, so I might of missed them. I did notice a nice set of shimano break leavers that might suit.
Have you investigated replace the head on the forks you got from me? Possibly a Jim Bundy question.
BTW, the Nunnery closes up well before 9.30pm.
Have you investigated replace the head on the forks you got from me? Possibly a Jim Bundy question.
BTW, the Nunnery closes up well before 9.30pm.
2. August
Cost = $210 (or $530 if you count the replacement wheels)
OK, I've got the frame, so now need to get the parts together. I put together a list, and spread the word that I was looking for parts. I got lucky, and friends offered a range of parts. Also bought some parts that I couldn't get hold of (brake calipers), or were worthwhile getting new (bar, bottom bracket).
Parts list
Cranks donated
Headset donated
Forks donated
Brake levers donated
Stem donated
Seat post donated
Tyres leftovers
Wheels pinched from my track bike (I bought new replacement wheels - $320)
Brake calipers eBay $50 2nd hand nice ones (double-pivot type - these will actually stop you!)
Bar $50 new
Bottom bracket $110 new (expensive Ultegra "Octalink" type to fit the donated cranks)
Now, depending on your luck or budget, you could get all these parts together pretty quick. For me, it took a good month (August). But, I had time, so was willing to wait, and hoped that I might be able to do things a bit cheaper this way. My mate Marty in Canberra donated all the listed parts - all I had to do was wait until the next visit! I also watched and waited for stuff on eBay, but eventually only bought brake calipers from there.
3. Saturday 25th August: File your way through incompatability!
Cost = $0 (just a day from my life)
Those brake calipers I bought on eBay arrived this week, and I was excited to see how they would look on the bike. So, I set up the frame and went to fit the brakes. Of course, I was just asking for something to go wrong.

The silver nut in my fingers is meant to slip through the bridge hole there. Trouble is, the hole is too small - there's no way I'm gonna get that sucker in there to hold the brake in place!
So, I take the frame off to a bike shop to ask someone who might have a clue about what to do to solve this problem. It's a tricky one - the hole is obscured by the seat tube, so there's no way to get a drill in there. The bike shop guy, who used to be an aeronautics engineer, reckoned that all it would need is a special drill that has a fitting to allow it to drill at right angles. Sure, they used to use them all the time at QANTAS, but of course he doesn't have one in the bike shop.
I was stumped. The only thing I can think of is to try the metal-working place on the corner near where I live. They fixed my bed frame when it fell apart, so the bike shouldn't be too much harder, right? Wrong.
"But try the place in Marrickville. It's called Marrickville Machinery, on mumble street".
What street?
"Chodmumble street - but hurry, they close in half an hour"
Umm, OK, I'll give that a shot.
I was confused. The guy had a heavy Portuguese accent, and I couldn't tell whether getting him to repeat the street name would actually help. Plus, he looked like he'd had a really long week. I felt sure that if I asked him to repeat himself again he'd flame me with the blowtorch he'd just put aside.
Desperate to get this job done, I slung the frame into the back of the car and drove off to find whatever this street was. It turned out to be Chalder St, full of workshops that didn't really cater for the casual passer-by. Most didn't have signage, so the only way I could tell what they actually were was to stick my head inside the big roller doors and have a gander. One was a panelbeater. One was a box warehouse. Another panelbeater/funny-lookin' hotrod place. One without a roller door (definitely odd).
I asked for Marrickville Machinery at each place. Eventually was pointed in the direction of a shop whose wall had fallen in - recently, by the looks. The whole front of the building - about three metres wide! There were electricians trying to rewire the place so it had power, and builders doing their best to stop more wall from falling in. I asked inside. Yes, they were the place I was looking for, but they couldn't do a thing for me - they had no power because when the car crashed into the front of the building, it took out the mains. Anyway, they didn't have the right tool for the job.
I got home. I was tired, sweaty and depressed. I moped around for a bit, drank a coffee without even caring about what it tasted like. I felt bad, like I'd just wasted my whole morning and early afternoon. Then I suddenly, for some reason, remembered that I had a round file in my toolbox. Perhaps I could file the hole by hand? I set to work!


Filing away at the hole to make it big enough for the brake bolt to fit
After about an hour of filing away, the brake bolt finally slipped into the frame. I'd done it!
Which was when I noticed that the brake was never going to work in that frame. The caliper arms were too short to reach the rim.

Notice how the brake pads are clamping between the tyre and the rim? That's bad. It means these brakes don't have long enough reach and I'm gonna have to get some others.
It was 6 pm. I'd had enough and called it a day.
Cost = $0 (just a day from my life)
Those brake calipers I bought on eBay arrived this week, and I was excited to see how they would look on the bike. So, I set up the frame and went to fit the brakes. Of course, I was just asking for something to go wrong.
The silver nut in my fingers is meant to slip through the bridge hole there. Trouble is, the hole is too small - there's no way I'm gonna get that sucker in there to hold the brake in place!
So, I take the frame off to a bike shop to ask someone who might have a clue about what to do to solve this problem. It's a tricky one - the hole is obscured by the seat tube, so there's no way to get a drill in there. The bike shop guy, who used to be an aeronautics engineer, reckoned that all it would need is a special drill that has a fitting to allow it to drill at right angles. Sure, they used to use them all the time at QANTAS, but of course he doesn't have one in the bike shop.
I was stumped. The only thing I can think of is to try the metal-working place on the corner near where I live. They fixed my bed frame when it fell apart, so the bike shouldn't be too much harder, right? Wrong.
"But try the place in Marrickville. It's called Marrickville Machinery, on mumble street".
What street?
"Chodmumble street - but hurry, they close in half an hour"
Umm, OK, I'll give that a shot.
I was confused. The guy had a heavy Portuguese accent, and I couldn't tell whether getting him to repeat the street name would actually help. Plus, he looked like he'd had a really long week. I felt sure that if I asked him to repeat himself again he'd flame me with the blowtorch he'd just put aside.
Desperate to get this job done, I slung the frame into the back of the car and drove off to find whatever this street was. It turned out to be Chalder St, full of workshops that didn't really cater for the casual passer-by. Most didn't have signage, so the only way I could tell what they actually were was to stick my head inside the big roller doors and have a gander. One was a panelbeater. One was a box warehouse. Another panelbeater/funny-lookin' hotrod place. One without a roller door (definitely odd).
I asked for Marrickville Machinery at each place. Eventually was pointed in the direction of a shop whose wall had fallen in - recently, by the looks. The whole front of the building - about three metres wide! There were electricians trying to rewire the place so it had power, and builders doing their best to stop more wall from falling in. I asked inside. Yes, they were the place I was looking for, but they couldn't do a thing for me - they had no power because when the car crashed into the front of the building, it took out the mains. Anyway, they didn't have the right tool for the job.
I got home. I was tired, sweaty and depressed. I moped around for a bit, drank a coffee without even caring about what it tasted like. I felt bad, like I'd just wasted my whole morning and early afternoon. Then I suddenly, for some reason, remembered that I had a round file in my toolbox. Perhaps I could file the hole by hand? I set to work!
Filing away at the hole to make it big enough for the brake bolt to fit
After about an hour of filing away, the brake bolt finally slipped into the frame. I'd done it!
Which was when I noticed that the brake was never going to work in that frame. The caliper arms were too short to reach the rim.
Notice how the brake pads are clamping between the tyre and the rim? That's bad. It means these brakes don't have long enough reach and I'm gonna have to get some others.
It was 6 pm. I'd had enough and called it a day.
-
Simon Llewellyn
- Posts: 1532
- Joined: 13 Nov 2006, 22:31
- Location: Tempe Velodrome
Gee Huw that is excellent, the photos look great. The page is updated. I think I'm going to have to work out a way to run bars down the side of the track page so we can have multiple links... & give it a more prominent positioning....
4. Saturday 22nd September
Cost = $13.50
I've spent pretty much all my free time in the last month preparing for the huge Grafton to Inverell race, which happened last weekend. Whole days were gobbled up chasing hills or long distances, and when not riding, I was napping so I'd have the energy just to get to bed!
So today was the first free time I'd had for around a month, and I was really looking forward to building the fixie within the day. All I needed was to score a longer-reach brake for the rear, and I was sure I'd be smelling the sweet aroma of achievement by the end of the day.
Just before leaving the house to pick up the brake, I decided to check and make sure the fork fitted the frame. To my absolute amazement, I found that it didn't - it was too small! What the? I'd already checked this, I was sure!! How the heck did I miss this??

Before jumping in and trying to fit the fork, I thought I'd just check the fork for size (something which I was sure I'd already done). I did this by positioning the two ends of the headset (the silver screw-on bits) at the limits of the steerer tube (the long grey thing). It's not very clear in this shot, but where my fingers are, there's not enough length in the steerer tube - this means the fork is too small! Arrrrgghghh!!
That sweet aroma of achievement was rapidly becoming a foul stench of disappointment, leading, with little doubt, to the choking gas of failure.
I found longer reach brake calipers at the first place I went ($10 for an unused old set, slightly rusty in places), but was having no luck finding forks that would fit. I tried all the most useful bike shops I know - Al Sumner in Hurlstone Park, Burwood Cycleworld, Stanmore Cycles, Universe Cycles in Parramatta, Ashfield Cycles. It was useless - I was looking for an unusually large fork in an outdated size (1" threaded - forks these days are all 1 1/8" and threadless), and no-one had the space to keep such an old product in stock. One option was to get one specially ordered, but that would cost $80 and take three to five weeks.
I was running out of time, and at my wit's end about what to do about the fork. My absolute deadline for completing this project was 3rd November - the Tempetation Fixie Century. So, I still had just over a month.
It wasn't all bad news today, however. Like I said, I did find a rear brake to fit, and also picked up a seat-post bolt on my travels between different bike shops.

The new old rear brake

Fits perfectly! Brake blocks clamp right onto the braking surface of the rim, and aren't going to rub against the tyre.

I also managed to score a seat-post bolt for $3.50.
Cost = $13.50
I've spent pretty much all my free time in the last month preparing for the huge Grafton to Inverell race, which happened last weekend. Whole days were gobbled up chasing hills or long distances, and when not riding, I was napping so I'd have the energy just to get to bed!
So today was the first free time I'd had for around a month, and I was really looking forward to building the fixie within the day. All I needed was to score a longer-reach brake for the rear, and I was sure I'd be smelling the sweet aroma of achievement by the end of the day.
Just before leaving the house to pick up the brake, I decided to check and make sure the fork fitted the frame. To my absolute amazement, I found that it didn't - it was too small! What the? I'd already checked this, I was sure!! How the heck did I miss this??
Before jumping in and trying to fit the fork, I thought I'd just check the fork for size (something which I was sure I'd already done). I did this by positioning the two ends of the headset (the silver screw-on bits) at the limits of the steerer tube (the long grey thing). It's not very clear in this shot, but where my fingers are, there's not enough length in the steerer tube - this means the fork is too small! Arrrrgghghh!!
That sweet aroma of achievement was rapidly becoming a foul stench of disappointment, leading, with little doubt, to the choking gas of failure.
I found longer reach brake calipers at the first place I went ($10 for an unused old set, slightly rusty in places), but was having no luck finding forks that would fit. I tried all the most useful bike shops I know - Al Sumner in Hurlstone Park, Burwood Cycleworld, Stanmore Cycles, Universe Cycles in Parramatta, Ashfield Cycles. It was useless - I was looking for an unusually large fork in an outdated size (1" threaded - forks these days are all 1 1/8" and threadless), and no-one had the space to keep such an old product in stock. One option was to get one specially ordered, but that would cost $80 and take three to five weeks.
I was running out of time, and at my wit's end about what to do about the fork. My absolute deadline for completing this project was 3rd November - the Tempetation Fixie Century. So, I still had just over a month.
It wasn't all bad news today, however. Like I said, I did find a rear brake to fit, and also picked up a seat-post bolt on my travels between different bike shops.
The new old rear brake
Fits perfectly! Brake blocks clamp right onto the braking surface of the rim, and aren't going to rub against the tyre.
I also managed to score a seat-post bolt for $3.50.
5. Saturday 6th October
Cost = $0
People have been asking me how the fixie project is going. I've been moodily answering "not so great", and relating the problems with finding forks to fit the unusually large frame. Then, this week at track training, I got talking to a guy who suggested visiting Peter Bundy, who had recently re-opened for business in Riverwood (after being closed for several years). Peter and his dad Jim are well-known as framebuilders - perhaps they had something lying around that would work?
So, today, I went out to Riverwood to visit Peter. Not long after we started chatting, he showed me an old, large, unpainted frame sitting in the corner. What really caught my eye was that it had old, large, unpainted large forks to match! Peter sensed that he had an interested customer, and started to put a deal together. He offered to make a range of alterations to the frame which would make it perfect for a fixie:
- Adjust the spacing between the rear stays (from the road standard 130 mm to the track/fixie standard 120 mm)
- Adjust the position of the rear brake bridge (so I could run those short-reach calipers I got on eBay)
- Replace the dropouts with track-forks
- Attach a pump peg (so I can carry my trusty Zefal #4 frame pump)
- And after careful measurement, put a new steerer tube in the forks so they would fit (they were still too small!!)
- Give it a shiny new powdercoat (paintjob)
I was beginning to realise that I'd run out of patience with trying to fix the problems with the yellow Fulcheni frame. The alterations that Peter was suggesting were all really useful, and would make for a pretty much perfect fixie for road training and longer-distance fixed riding. This new frame even had bolts for two bottles (which you definitely need in Sydney), whereas the Fulcheni only had bolts for one. I decided on the spot to hang the expense ($290), and get the job done right!
Nice narrative Huw!
What will you do with the Fulcheni frame now? Put it up on eBay so that another poor soul can enjoy the resurrection process?
What will you do with the Fulcheni frame now? Put it up on eBay so that another poor soul can enjoy the resurrection process?
-
Simon Llewellyn
- Posts: 1532
- Joined: 13 Nov 2006, 22:31
- Location: Tempe Velodrome
Love your work Huw!
6. Friday 19th October
Cost = $342
During this week, I got a long-awaited call from Peter Bundy, telling me that my frame would be ready to go! I was lucky enough to have a day owing at work, and decided that I'd take it, to spend building the fixie. I'd planned everything - there would be nothing standing in my way today. It was success or bust!
So, off I went to Riverwood. There, sitting in Peter's shop, was the frame, in all its orangey-red glory!


Peter pressing the the headset cups into the frame

Final adjustments to the headset - forks are in!
It was excited. The frame, alterations and new paint job cost $290. Peter even threw in a seat post, which was great, since the other one I had turned out to be broken.

The new frame, fork and headset assembled and ready for building up

Bottom bracket

Track forks instead of horizontal dropouts

Detail of lower heat tube lug
First up, I installed that expensive bottom bracket.


I removed the large chainring from the crankset (using a set of narrower $15 BMX chain bolts to secure the remaining small chainring to the cranks). Then, I was ready to bolt the cranks to the bottom bracket axle.


Then, I bolted the brake calipers to the frame and fork. They went on no worries, and they fit!

No tyre rubbing here!
Next for the bars, brakes and stem. I threaded the bars into the stem, and then inserted into the steerer tube.


I remembered to take real care with aligning the handlebars - I don't find these older quill-type stems as easy to adjust as the new threadless systems

I like the way the gum rubber hangs over the side of the brake lever - reminiscent of fabulous 70s sideburns, don't you think?

I took care to get the chainline very straight, to minimise the risk of losing the chain during riding. I found that leaving the small chainring on the inside of the crankarm spider was the best position for it. Add a $10 chain from Al Sumner, et voila! It's starting to look like a real bike!


I spent some time trimming the $15 brake cable housing to length.
Now, the pièce de résistance; some $12 "Bartenders" brand bar tape that I picked up from Mick Mazza!

There were so many reasons to love this tape. "Bartenders" brand. "Handle bar software". So witty! But wait, it was also a timeless marble effect pattern! So funny and so so sexy, I just can't understand how this was left, unsold, to gather dust on Mick Mazza's shelves!
FINISHED!!


Cost = $342
During this week, I got a long-awaited call from Peter Bundy, telling me that my frame would be ready to go! I was lucky enough to have a day owing at work, and decided that I'd take it, to spend building the fixie. I'd planned everything - there would be nothing standing in my way today. It was success or bust!
So, off I went to Riverwood. There, sitting in Peter's shop, was the frame, in all its orangey-red glory!
Peter pressing the the headset cups into the frame
Final adjustments to the headset - forks are in!
It was excited. The frame, alterations and new paint job cost $290. Peter even threw in a seat post, which was great, since the other one I had turned out to be broken.
The new frame, fork and headset assembled and ready for building up
Bottom bracket
Track forks instead of horizontal dropouts
Detail of lower heat tube lug
First up, I installed that expensive bottom bracket.
I removed the large chainring from the crankset (using a set of narrower $15 BMX chain bolts to secure the remaining small chainring to the cranks). Then, I was ready to bolt the cranks to the bottom bracket axle.
Then, I bolted the brake calipers to the frame and fork. They went on no worries, and they fit!
No tyre rubbing here!
Next for the bars, brakes and stem. I threaded the bars into the stem, and then inserted into the steerer tube.
I remembered to take real care with aligning the handlebars - I don't find these older quill-type stems as easy to adjust as the new threadless systems
I like the way the gum rubber hangs over the side of the brake lever - reminiscent of fabulous 70s sideburns, don't you think?
I took care to get the chainline very straight, to minimise the risk of losing the chain during riding. I found that leaving the small chainring on the inside of the crankarm spider was the best position for it. Add a $10 chain from Al Sumner, et voila! It's starting to look like a real bike!
I spent some time trimming the $15 brake cable housing to length.
Now, the pièce de résistance; some $12 "Bartenders" brand bar tape that I picked up from Mick Mazza!
There were so many reasons to love this tape. "Bartenders" brand. "Handle bar software". So witty! But wait, it was also a timeless marble effect pattern! So funny and so so sexy, I just can't understand how this was left, unsold, to gather dust on Mick Mazza's shelves!
FINISHED!!
-
Simon Llewellyn
- Posts: 1532
- Joined: 13 Nov 2006, 22:31
- Location: Tempe Velodrome
I love how we've labeled it Huw's simple guide to building a fixie & well it is one of the most complex fixie jobs yet!
I realised this page probably won't be much help to a beginner. I found myself trying to describe things such as "steerer tube" in the text, but then dropping the reader right into complicated issues like why 1" threaded was making my life way harder than 1 1/8" threadless, without any explanation. I apologise for these inconsistencies.
Hey Huw, Great job with the fixie! Now you have to send it in to http://www.fixedgeargallery.com/ I suggest you think long and hard about the compostion of the photo. Perhaps you could use set it up next to dramatic landscape like the Harbour Bridge or the Opera House? Or perhaps, just hot girl in high-heels will do (a la http://www.fyxomatosis.com/cgi-bin/pro/ ... mbs;p=Ciao!) With a bit of luck it you'll get the http://bikesnobnyc.blogspot.com/ "Seal of Approval".
Enjoy!
Enjoy!
FAswad, do you want standard diameter or oversized? Deda Newtons come in a dark metal polish, actual pics here http://weightweenies.starbike.com/phpBB ... hp?t=35858
Otherwise, i'll let you know what other choices there are.
Otherwise, i'll let you know what other choices there are.
Yes, the dark metal finish is quite nice and you might have seen them on my Ridley.
I got those bars from Al. They're beautiful 3T Merkcx. Stamped with Italian writing. I think they're one of the best looking parts of the bike - they're like totally 0Ld 5k00L!
7. Closing remarks from a hardened, experienced fixie-builder
Cost = priceless
In total, my fixie cost $565.50 (not counting the wheels I pinched from another bike). I probably wouldn't have been prepared to spend this much at the beginning, but I have to live with it. The truth is, I'm really happy with it.
Having gone through the occasionally painful (but ultimately satisfying) process of building a fixie, I thought I'd take this opportunity to reveal my most treasured, hard-won gems of wisdom for your benefit. Just remember that these are my opinions (in which case they're probably wrong), so like anything in life, think critically about them.
Frame material
My preference is steel, because it's tough, comfortable and cheap. If you're lucky, you'll get something with beautiful lugs that you can admire when you're stuck at a traffic light. Also, bike weight is not really an important factor, ruling out the only reason why you wouldn't choose steel.
For those with a big collection of old parts
Scoring an old frame like the one I started with is probably the way to go. Hopefully some of those old parts you've got hanging around will be compatible with the frame, and you'll be able to build the fixie just how you like.
For those on a budget
For those on a budget, I think the very best thing to do would be to buy an old complete bike from eBay or someplace. I reckon you could get something pretty decent for $200-300. The main benefits of getting a second-hand bike are that you get a bunch of components that fit, avoiding the main problems I had with compatability of different parts. You could always add better things later, like better brakes or nicer wheels, but at least you've got a platform to work from. The cool thing about fixies is that there's probably no reason why an old one resurrected out of an old steel road bike would be any slower than a new expensive custom job (I reckon mostly because since riding a fixie is so demanding, the performance is mostly determined by rider fitness, not the weight or expense of the bike).
For those with more to spend, within reason
More and more, people are interested in riding fixed gear bikes, and bike manufacturers are responding by producing road-going fixies. You'll probably be looking at around $800-$1000 for the steel Fuji Track or the Specialized Langster. You may need to add or swap some parts to make it useful for riding long road distances.
For those rolling in cold, hard cash
I'm totally envious. There are some really nice higher-end fixie-specific frames out there, like the steel Surly Steamroller ($750), or the steel Soma DeLancey ($1320). It would also suggest chatting up your local framebuilder (I, and many others, can recommend Peter Bundy), for pricing on a full custom job. You might be surprised how affordable it could be. Then, assemble the kit of your dreams and build the bike that's the envy of the bunch!
I believe he has some 42 cm ones somewhere!I ENVY YOU
-
Simon Llewellyn
- Posts: 1532
- Joined: 13 Nov 2006, 22:31
- Location: Tempe Velodrome
All done. Up on the web. ..
How important is it for a fixie frame to have those track horizontal drop-outs?
Horizontal drop-outs are good because if you pull the wheel (make it shift it's position in the rear triangle due to high load) it'll only go backwards & could jam into the chain stay rather than pop out of the frame as it can with the road parallel drop-outs from the older style road bikes. Parallel dropouts are designed so that no-matter where the axel sits in the drop-out the rim will always be in to same position with respect to the rear brake pads.How important is it for a fixie frame to have those track horizontal drop-outs?
Given that tension of the chain comes from where rear axel is positioned track drop-outs & rear brakes don't go well together. I have been using a 18 fixed & 16 freewheel & have the rear brake blocks set so they sit almost too high for one & almost too low for the other ie never quite right. Parallel roadie drop-outs fix this problem. Parallel drop-outs are not so bad however make sure you do those rear nuts up real tight before you do the Sean Eadie at the traffic lights.
Thanks for the explanation Lindsay.
So I gathered from Huw's experience that it is possible to change the drop-out in a steel frame. I guess the reverse question now is, if the parallel drop-out is so great, why aren't they used for regular road bike? Was it because of the presence of RD?
The point on the brake pad position is interesting. I can't visualize how a change in axle position would not affect the pad position on the rim. Ummm...
-
Simon Llewellyn
- Posts: 1532
- Joined: 13 Nov 2006, 22:31
- Location: Tempe Velodrome
I'm not sure you spent enough money Huw, Going by the latest machines on fixed gear gallery!!! Disc wheels are in this season...
http://www.fixedgeargallery.com/2007/oc ... oolfie.htm
http://www.fixedgeargallery.com/2007/oc ... oolfie.htm
That's a track bike, not for road consumption.I'm not sure you spent enough money Huw, Going by the latest machines on fixed gear gallery!!! Disc wheels are in this season...
http://www.fixedgeargallery.com/2007/oc ... oolfie.htm
-
Simon Llewellyn
- Posts: 1532
- Joined: 13 Nov 2006, 22:31
- Location: Tempe Velodrome
What about this Koga then? It's a track bike turned fixie!
http://www.fixedgeargallery.com/2007/oct/3/Ali.htm
http://www.fixedgeargallery.com/2007/oct/3/Ali.htm
I'm glad you noticed Simon. Actually, there are three reasons I had to save my money. I'm sure you'll agree they're all worthy of the sacrifice:I'm not sure you spent enough money Huw, Going by the latest machines on fixed gear gallery!!!
1. For beers at Bundanoon
2. To fund an ad campaign promoting the use of marble-effect bar tape
3. To begin a Softride museum:
-
Simon Llewellyn
- Posts: 1532
- Joined: 13 Nov 2006, 22:31
- Location: Tempe Velodrome
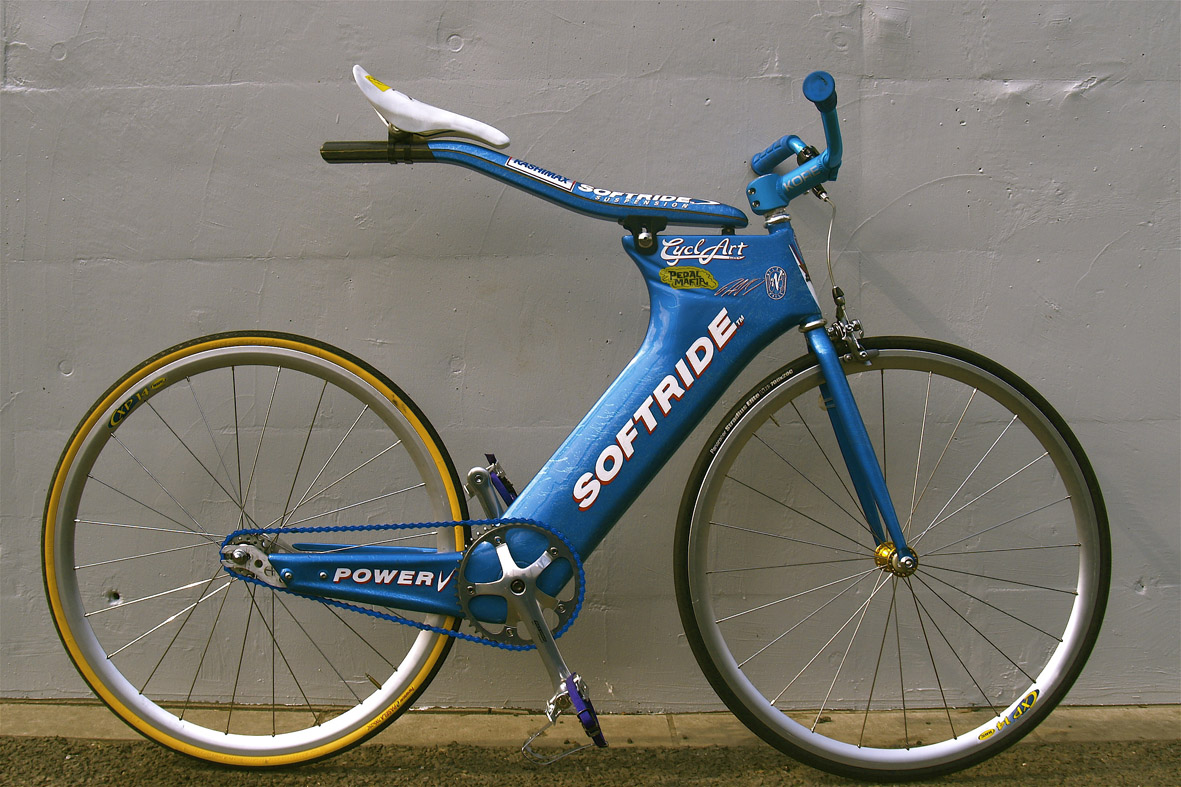
Who own the softride? It makes a very unique fixie!
Sorry, I actually don't know his shop address - it's on New Canterbury Rd, opposite the 7/11 servo in Hurlstone Park. There's a penny farthing parked out the front. Or catch up with him on a Sunday ride.where can one grab Al?
-
mikesbytes
- Posts: 6991
- Joined: 13 Nov 2006, 13:48
- Location: Tempe
- Contact:
No rear brake (apart from the pedals)Who own the softride? It makes a very unique fixie!
-
mikesbytes
- Posts: 6991
- Joined: 13 Nov 2006, 13:48
- Location: Tempe
- Contact:
Don't know anything about them, but here's an example of the special hubsHow important is it for a fixie frame to have those track horizontal drop-outs?
http://bicycles.net.au/forums/viewtopic ... 0463#40463
Maybe you really saved the money so you could get some of these http://www.thebikebiz.com/product_p/trk-bar-nitto09.htm and the matching sugino cranks http://www.thebikebiz.com/ProductDetail ... CR%2DSUG04
You'll have to have it hosted elsewhere eg. Photobucket.com, and then insert the proper link in the mail message. Make sure you resize and compress the image so that it's suitable for web viewing/loading. Typically I use 7" across while maintaining the aspect ratio, jpeg compression so that it's around 100kb.
-
mikesbytes
- Posts: 6991
- Joined: 13 Nov 2006, 13:48
- Location: Tempe
- Contact:
Upload the picture to flicr or photobucket or where ever and link it
-
mikesbytes
- Posts: 6991
- Joined: 13 Nov 2006, 13:48
- Location: Tempe
- Contact:
Ya bet meYou'll have to have it hosted elsewhere eg. Photobucket.com, and then insert the proper link in the mail message. Make sure you resize and compress the image so that it's suitable for web viewing/loading. Typically I use 7" across while maintaining the aspect ratio, jpeg compression so that it's around 100kb.
Network latency across the Tasman Sea cable must have been bad. So you have a fact based excuse.Ya bet me
OMG! Matt has turned into a bling man.
Now in strict bling standard, you'll just have to flip it! (the stem of course)
Now in strict bling standard, you'll just have to flip it! (the stem of course)
-
mikesbytes
- Posts: 6991
- Joined: 13 Nov 2006, 13:48
- Location: Tempe
- Contact:
Matt, why do you have the handlebars so high? Back problem?
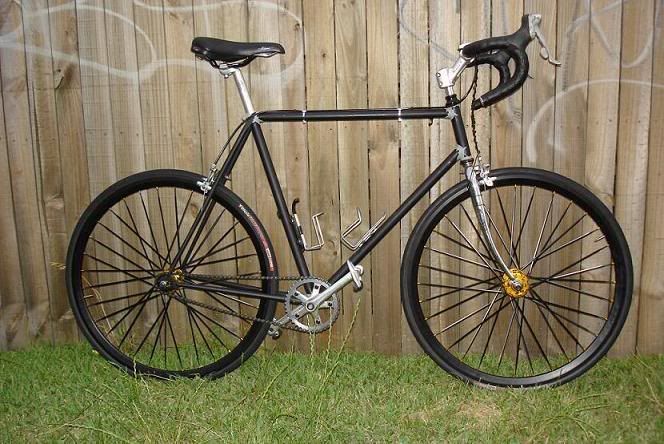
Matt - I recognise those wheels - bought a pair meself and swapped for the old wheels on my (currently underused) track bike! I notice you took the stickers off, though. You got them from Al, right? He called me a "McGulliver" for buying them instead of the cheaper ones with regular spokes. Apparently a McGulliver is someone who wants the stuff that other people don't have, or can't afford. Then said that he totally understood, because he made sure he had all the best stuff in his day.
Yeah, theyre deep Vs. I originally planned to get the silver rims, spokes and hubs but these where the only ones he had with the flip flop hub. (and he said that huw got em so they must be cool) I'm having the morning afters slightly, not sure if theyre too much, haven't ridden it yet.
Building and rebuilding this bike has been a great learning experience for me, and an exercise in fitting the bike to the riding style and position I actually prefer rather than the position I think I 'should' have. As it has evolved I have moved away from certain assumtions I had about what the 'right' setup should be:
1. Hard Saddle. The saddle has come forward and has gone from super hard to super soft. A softer saddle reduces the spine jolt when i spin. Maybe I am just getting old, but after about five saddles I am liking this one.
2. Low Bars. The bars have come up and back. This way I can bend my elbows comfortably without causing back pain. Also with the bars lower I just wasn't using the drops, these bars have a big drop on them too so having the tops high seems to work. I was getting numbness in my fingers from having too much weight on my hands - and from the downhill fixie deathgrip I sometimes assume when I am forcefully reminded of my mortality at 160rpm.
3. Aero levers. I switched from aero brake levers to old shifters because I find that they give me a couple more hand positions and reduce the 'road buzz' that was making my hands numb. I also went for double bar tape for this reason.
4. Short cranks for spin. The cranks have got longer. Changing from 170 to 175 has made both climbing and spinning easier.
Over the last month I have gone for a few long fixie rides (longer than i have ever ridden before) and found that what might be fine for a few hours ride to waterfall becomes unbearable after 4 or 5 hours. I want to be able to ride this thing long distances regularly, it doesn't need to feel like a suspended downhill bike, but if it causes injury/pain in the long run I just won't ride it as much.
-
Grant Bond
- Posts: 113
- Joined: 14 Mar 2007, 21:28
Noice set up matty...look at moi .
I dont know if i can call your bike "Matt Black" that any more, maybe the bike has to have some gangsta name wid all dat bling!
Interestingly your bar set up looks a lot like the recomendation of the boys from Rivendell bikes.
Google them to see what i mean (and some of the sexiest lugs you will ever set eyes on ).
Cheers
Grant
Who is online
Users browsing this forum: No registered users and 1 guest